3rd chapter of our beginner's guide : Organize your CV library for better recruitment.
Import CVs
To import CVs, the first thing you need to do is go to a recruitment site.
🎮 Practical example:
Let's use our recruitment [Candidature Spontanée] created at the start of training.
Go to recruitment and click on Import CVs (top right).

Several import options are available: manual creation of the file, drag-and-drop import or import by e-mail. In all cases, each candidate record is created in the Inbox step.
Manual creation of a candidate file
Click on the link "Create a candidate file manually".
Enter the candidate's identity and contact details, import documents (CV, covering letter, diplomas...) and click on Add.
Manual import
You can either open the file explorer (by clicking on the blue area) and select the file, or drag and drop the file directly onto the blue area.
A new candidate file will be created automatically. You can then modify it directly.
Import by e-mail
Import a candidateYou can create a candidate by importing several documents in a single email.
Please note: This method is only valid for importing a single candidate!
Send an e-mail to the recruitment file import address. You'll find it under the advertisements insert.

You can add as many attachments as your e-mail can send.
🚀 Tip for use:
Put the CV first in your attachments. In this way, it will be visible first on the candidate form.
This facilitates parsing, in other words, the automatic completion of your candidate file.
Import several candidates simultaneously
This method allows you to import several CVs simultaneously into a single recruitment. As e-mail attachments are limited in size, you won't be able to import more than a dozen CVs at a time.
Please note that each attachment will be considered as a separate CV. As a result, as many candidate files will be created as attachments.
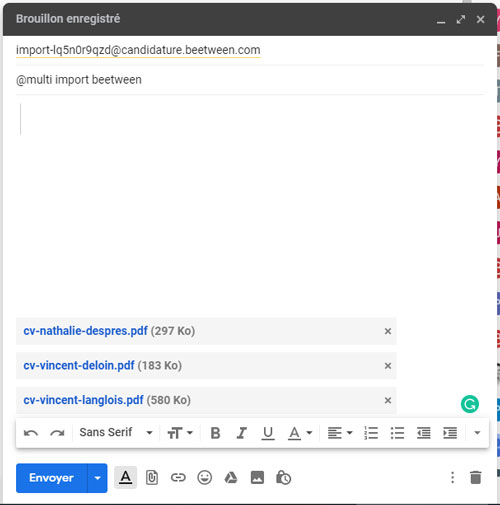
Email subject: @multi import beetween
The recruitment process
Getting to grips with workflow
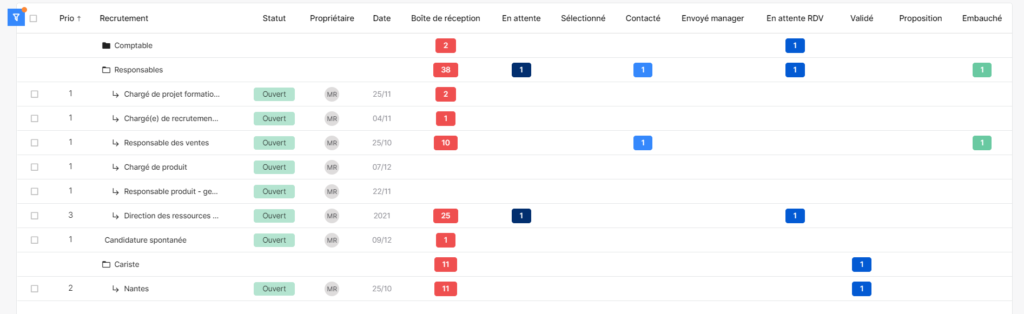
Recruitment follows several stages. Let's take a look at some of the most popular ones:
- Inbox: recruitment applications received
- Selected: candidates pre-selected for interviews
- Waiting for an appointment: candidates waiting for an appointment (physical or video).
- Hired: candidates hired by your company
- Archived: candidates not selected for recruitment but kept in database (CVthèque)
- Trash: candidates not selected for recruitment and not kept in database (CVthèque). The candidate record is not deleted from the database (in the event of a move error).
- Spam: applications automatically put aside
Spam folder configuration
Beetween offers an AntiSpam CVs filter. It automatically sets aside applications that don't match your search criteria.
To set the filter, go to the relevant recruitment :
- Select Antispam CVs in the top right-hand corner.
- Activate the spam filter and fill in the keywords
- Click on Save
🎮. Practical example:
Take our Front-End Developer recruitment. We expect our candidates to be proficient in CSS and Javascript, as well as the ReactJS framework.
As Javascript can be written JS in an abbreviated form, we'll write the 2 expressions on the same line, separated by a comma. Antispam will understand that these expressions are equally valid.
📌 Good to know:
Activate the filter before posting an ad or importing CVs. The filter cannot act retroactively on candidates already in the recruitment process.
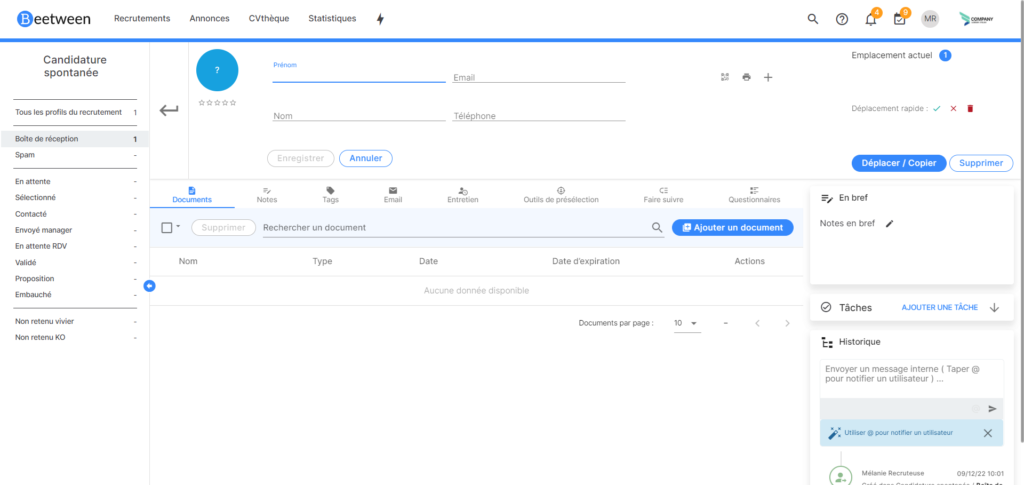
Handling a candidate file
There are 2 ways to access a candidate file:
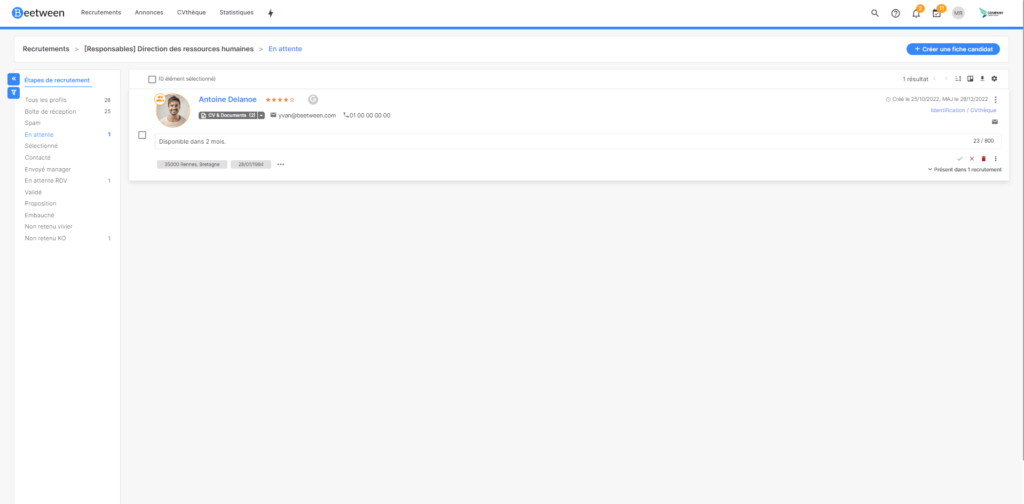
From My recruitments :
- Locate your recruitment line
- Click on the number of the desired stage to display the list of candidates present in the stage in question.
- Click on the candidate's name
The first icon displays the different stages of your recruitment process. The second, in the form of a funnel, takes you to the advanced search. To find out more about using advanced search, click here.
From Ma CVthèque :
- Click on the candidate's name
- Let's take a look at the main tabs of a form.
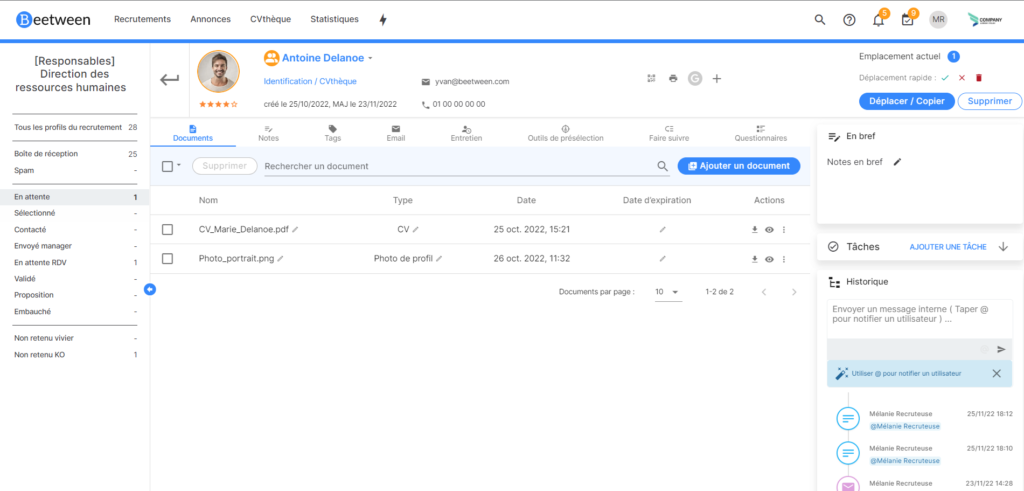
It is filled in automatically when the application is received, or when the CV is uploaded if you have imported the CV yourself. Clicking on the name allows you to modify the identity and contact details.
DocumentsAll documents supplied by the candidate are stored here. Use the icons at the end of the line to perform various operations:
- Download document
- See the document at a glance
- Use the drop-down menu :
- Move the document to the top of the list
- Customize the document (very useful for anonymizing)
- Analyze the attachment (to run a new parsing operation)
- Edit document
- Delete document
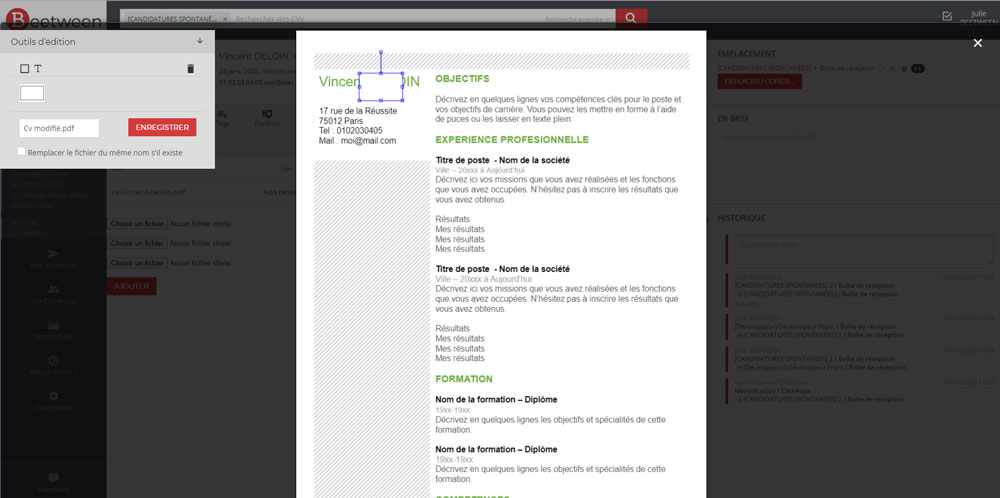
🚀 Tip: "Blinder" a CV
Blinding a CV means making it anonymous. The easiest way is to remove the candidate's name and contact details from the document. This action is very useful when you want to ask a third party for an impartial opinion on a CV.
To anonymize the CV :
1- Go to the 3 vertical dots at the end of the document line
2- Select Customize
3- Click on the square in Editing Tools and move the white box over the name and coordinates (you can also use an image if your configuration allows).
4- You can resize the white block, or generate several of them.
🚀 Tip: Add a profile photo to the candidate file
Import a photo for profiling (.jpg, .jpeg or .png)
Click on the small pencil that appears when you hover over the type
Select the "Profile photo" type and confirm.
Notes
You can take different types of notes in Beetween. However, only the contents of 'In brief' (on the right-hand side of your window) will be used when querying the search bar.
These notes are also visible in the 'Listed' view of candidates.
In this tab, you can exchange e-mails with candidates. We'll come back to this tab in more detail in the Communicating with candidates step.
Maintenance and VideoThese 2 tabs work in a similar way.
Both are designed to invite the candidate to an interview. In the 1st case, it will be a physical interview, and in the 2nd a video interview via videoconference. We'll come back to this tab in more detail in the Communicating with candidates step.
The "Forward" function allows you to send the candidate file to a third party so that they can give you their opinion on the application.
TodoThe Todo insert lets you note tasks to be done on an application.
You can set a callback date and time.
When the task is due, you'll get a notification in your Beetween platform to remind you of the action to take.
This space in the form header allows you to move (or copy) the candidate to another stage or recruitment. Clicking on the colored dot also shows the current location(s) of the file. By default, the menu on the left shows you the exact location of the Recruitment and stage the candidate is in.
In briefBrief notes are the most important summary notes on a candidate sheet, mainly for 2 reasons:
- They can be accessed in the general view, where the various candidates are listed.
- Their content is taken into account in the search
All actions on a candidate file are recorded here, whether they involve modifying the file or sending/receiving an e-mail.
A little tip: you can read the e-mails exchanged directly in this view by clicking on the e-mail in question!
Grouped actions
Certain actions are possible on several candidate files simultaneously.
To use them, select the various candidate files from the list.
Move/Copy, Messaging and Forwarding are the same functions you'll find in the candidate file.
This action removes the candidate from the current recruitment process, but keeps the record in your CV library. This is equivalent to the Archived stage in terms of usage. However, if you use the Remove function, you will delete all recruitment-related information (notes, interview reports, etc.) from the file.
DeleteThis action permanently deletes the candidate file and all the information it contains from Beetween. This action is definitive.
MergeAs you build up your CV database, you're bound to come across duplicate candidate records.
Duplicate records will be indicated by a small orange icon next to the candidate's name.
By clicking on the icon, you can choose to view similar records or ignore the doulon alert (which will remove the icon).
By selecting the records and clicking on Merge, you can delete duplicates and keep the oldest record. Key information such as documents and notes will be merged into the retained file.
Please note that this action is final!
To find out more...
🚀 Best practice #3: Creating breeding grounds
Get into the habit of organizing your CV library right from the start.
The best way to do this is to organize the talent kept on hand into pools. The easiest way is to use recruitment.
In fact, you're not obliged to publish an ad in a Recrutement.
So, if you're regularly looking for full-stack developers and sales people, it's a good idea to create a Recruitment section for these 2 professions.
Unsuccessful applications for current recruitment, and unsolicited applications that may be of interest in the future, will be moved to the Recruitment area created for this purpose.